1. CountDownLatch
概述: 用来控制一个线程等待多个线程
原理:
维护了一个计数器 cnt,每次调用 countDown () 方法会让计数器的值减 1,减到 0 的时候,那些因为调用 await () 方法而在等待的线程就会被唤醒
![]()
API:
- await(): 调用 await () 方法的线程会被挂起,它会等待直到 count 值为 0 才继续执行
- await(long timeout, TimeUnit unit): 和 await () 类似,只不过等待一定的时间后 count 值还没变为 0 的话就会继续执行
- countDown(): 将 count 值减 1
实例:
1
2
3
4
5
6
7
8
9
10
11
12
13
14
15
16
17
18
| public class CountdownLatchExample {
public static void main(String[] args) throws InterruptedException {
final int totalThread = 10;
CountDownLatch countDownLatch = new CountDownLatch(totalThread);
ExecutorService executorService = Executors.newCachedThreadPool();
for (int i = 0; i < totalThread; i++) {
executorService.execute(() -> {
System.out.print("run..");
countDownLatch.countDown();
});
}
countDownLatch.await();
System.out.println("end");
executorService.shutdown();
}
}
|
场景:
- 启动一个服务时,主线程需要等待多个组件加载完毕,之后再继续执行
- 实现多个线程开始执行任务的最大并行性
CountDownLatch (1),多个线程挂起,当主线程调用 countDown () 时,多个线程同时被唤醒
不足:
CountDownLatch 是一次性的,计数器的值只能在构造方法中初始化一次,之后没有任何机制再次对其设置值,当 CountDownLatch 使用完毕后,它不能再次被使用。
2. CyclicBarrier
概述: 用来控制多个线程互相等待,只有当多个线程都到达时,这些线程才会继续执行
原理:
线程执行 await () 方法之后计数器会减 1,并进行等待,直到计数器为 0,所有调用 await () 方法而在等待的线程才能继续执行
![]()
方法:
- await()
- await(long timeout, TimeUnit unit): 设置超时时间,超过该时间仍然还有线程还没到达屏障则忽略这些线程,将等待的线程全部释放
区别: CyclicBarrier 和 CountdownLatch 的区别是,CyclicBarrier 的计数器通过调用 reset () 方法可以 循环使用,所以它才叫做循环屏障
构造器: CyclicBarrier 有两个构造函数,其中 parties 指示计数器的初始值,barrierAction 在所有线程都到达屏障的时候会选择一个线程执行一次
1
2
3
4
5
6
7
8
9
10
| public CyclicBarrier(int parties, Runnable barrierAction) {
if (parties <= 0) throw new IllegalArgumentException();
this.parties = parties;
this.count = parties;
this.barrierCommand = barrierAction;
}
public CyclicBarrier(int parties) {
this(parties, null);
}
|
实例:
1
2
3
4
5
6
7
8
9
10
11
12
13
14
15
16
17
18
19
20
21
| public class CyclicBarrierExample {
public static void main(String[] args) {
final int totalThread = 10;
CyclicBarrier cyclicBarrier = new CyclicBarrier(totalThread);
ExecutorService executorService = Executors.newCachedThreadPool();
for (int i = 0; i < totalThread; i++) {
executorService.execute(() -> {
System.out.print("before..");
try {
cyclicBarrier.await();
} catch (InterruptedException | BrokenBarrierException e) {
e.printStackTrace();
}
System.out.print("after..");
});
}
executorService.shutdown();
}
}
|
重用:
1
2
3
4
5
6
7
8
9
10
11
12
13
14
15
16
17
18
19
20
21
22
23
24
25
26
27
28
29
30
31
32
33
34
35
36
37
38
39
40
41
42
43
44
45
| public class Test {
public static void main(String[] args) {
int N = 4;
CyclicBarrier barrier = new CyclicBarrier(N);
for (int i = 0; i < N; i++) {
new Writer(barrier).start();
}
try {
Thread.sleep(25000);
} catch (InterruptedException e) {
e.printStackTrace();
}
System.out.println("CyclicBarrier重用");
for (int i = 0; i < N; i++) {
new Writer(barrier).start();
}
}
static class Writer extends Thread {
private CyclicBarrier cyclicBarrier;
public Writer(CyclicBarrier cyclicBarrier) {
this.cyclicBarrier = cyclicBarrier;
}
@Override
public void run() {
System.out.println("线程" + Thread.currentThread().getName() + "正在写入数据...");
try {
Thread.sleep(5000);
System.out.println("线程" + Thread.currentThread().getName() + "写入数据完毕,等待其他线程写入完毕");
cyclicBarrier.await();
} catch (InterruptedException e) {
e.printStackTrace();
} catch(BrokenBarrierException e) {
e.printStackTrace();
}
System.out.println(Thread.currentThread().getName() + "所有线程写入完毕,继续处理其他任务...");
}
}
}
|
3. Phaser
main:
1
2
3
4
5
6
7
8
9
10
11
| public static void main(String[] args) {
phaser.bulkRegister(7);
for (int i = 0; i < 5; i++) {
new Thread(new Person("p" + i)).start();
}
new Thread(new Person("新郎")).start();
new Thread(new Person("新娘")).start();
}
|
Phaser:指定什么阶段做什么事
1
2
3
4
5
6
7
8
9
10
11
12
13
14
15
16
17
18
19
20
21
22
23
| public ass MarriagePhaser extends Phaser {
@Override
protected boolean onAdvance(int phase, int registeredParties) {
switch (phase) {
case 0:
return false;
case 1:
return false;
case 2:
return false;
case 3:
return true;
default:
return true;
}
}
}
|
run:如何到达阶段逻辑
1
2
3
4
5
6
7
8
9
10
11
12
13
14
15
16
17
18
| public class Person implements Runnable {
@Override
public void run() {
phaser.arriveAndAwaitAdvance();
if (name.equals("新郎") || name.equals("新娘")) {
System.out.printf("%s 洞房!\n", name);
phaser.arriveAndAwaitAdvance();
}
else {
phaser.arriveAndDeregister();
}
}
}
|
4. ReadWriteLock
StampedLock
- 共享锁
- 排它锁
1
2
3
| ReadWriteLock readWriteLock = new ReadWriteLock();
Lock readLock = readWriteLock.readLock();
Lock writeLock = readWriteLock.writeLock();
|
5. Semaphore
概述: Semaphore 类似于操作系统中的信号量,可以 控制对互斥资源的访问线程数
原理:
acquire () 获取一个许可,如果没有就等待
release () 释放一个许可
![]()
构造器:
- Semaphore(int permits): 参数 permits 表示许可数目,即同时可以允许多少线程进行访问
- Semaphore(int permits, boolean fair): 这个多了一个参数 fair 表示是否是公平的,即等待时间越久的越先获取许可
API:
- acquire(): 获取一个许可
- acquire(int permits): 获取 permits 个许可
- release(): 释放一个许可
- release(int permits): 释放 permits 个许可
实例:
1
2
3
4
5
6
7
8
9
10
11
12
13
14
15
16
17
18
19
20
21
22
| public class SemaphoreExample {
public static void main(String[] args) {
final int clientCount = 3;
final int totalRequestCount = 10;
Semaphore semaphore = new Semaphore(clientCount);
ExecutorService executorService = Executors.newCachedThreadPool();
for (int i = 0; i < totalRequestCount; i++) {
executorService.execute(() -> {
try {
semaphore.acquire();
System.out.print(semaphore.availablePermits() + " ");
} catch (InterruptedException e) {
e.printStackTrace();
} finally {
semaphore.release();
}
});
}
executorService.shutdown();
}
}
|
6. Exchanger
线程交换
1
2
3
4
5
6
7
8
9
10
11
12
13
14
15
16
17
18
19
20
21
22
23
24
25
| Exchanger<String> exchanger = new Exchanger<>();
new Thread(() -> {
String s1 = "T1";
try {
s1 = exchanger.exchange(s1);
} catch (Exception e) {
e.printStackTrace();
}
System.out.println(Thread.currentThread().getName() + ":" + s1);
}, "t1").start();
new Thread(() -> {
String s2 = "T2";
try {
s2 = exchanger.exchange(s2);
} catch (Exception e) {
e.printStackTrace();
}
System.out.println(Thread.currentThread().getName() + ":" + s2);
}, "t2").start();
|
7. LockSupport
1
2
3
4
5
6
7
8
9
10
11
12
13
14
15
16
17
18
| Thread t = new Thread(() -> {
for (int i = 0; i < 10; i++) {
System.out.println(i);
if (i == 5) {
LockSupport.park();
}
try {
TimeUnit.SECONDS.sleep(1);
} catch (InterruptedException e) {
e.printStackTrace();
}
}
});
t.start();
LockSupport.unpark(t);
|
8. CompletableFuture
CompletableFuture 使用详解
CompletableFuture 避坑 1—— 需要自定义线程池
使用 CompletableFuture 时,那些令人头疼的问题
管理多个线程运行后返回的结果
- allOf ():所有任务全部完成才结束
- anyOf ():任意一个任务完成才结束
1
2
3
4
5
6
7
8
9
| CompletableFuture<Double> futureTM = CompletableFuture.supplyAsync(() -> priceOfTM())
.thenApply(String::valueOf)
.thenApply(str -> "price " + str)
.thenAccept(System.out::println);
CompletableFuture<Double> futureTB = CompletableFuture.supplyAsync(() -> priceOfTB());
CompletableFuture<Double> futureJD = CompletableFuture.supplyAsync(() -> priceOfJD());
CompletableFuture.allOf(futureTM, futureTB, futureJD).join();
|
1
2
3
4
5
6
7
8
9
10
11
|
LocalDate now = LocalDate.now(ZoneOffset.ofHours(8));
int totalCount = 4 * 7;
List<ReserveOrderCountVO> resultList = Lists.newArrayListWithExpectedSize(totalCount);
CompletableFuture[] completableFutures = Stream.iterate(0, n -> ++n).limit(totalCount)
.map(num -> CompletableFuture.supplyAsync(() -> this.getReserveCountByDate(reserveCountQuery, now.plusDays(num)), COUNT_EXECUTOR)
.whenComplete((result, e) -> resultList.add(result)))
.toArray(CompletableFuture[]::new);
CompletableFuture.allOf(completableFutures).join();
|
9. AQS 源码
Java 技术之 AQS 详解
内部维护一个 state 和一个双向线程链表
![]()
![]()
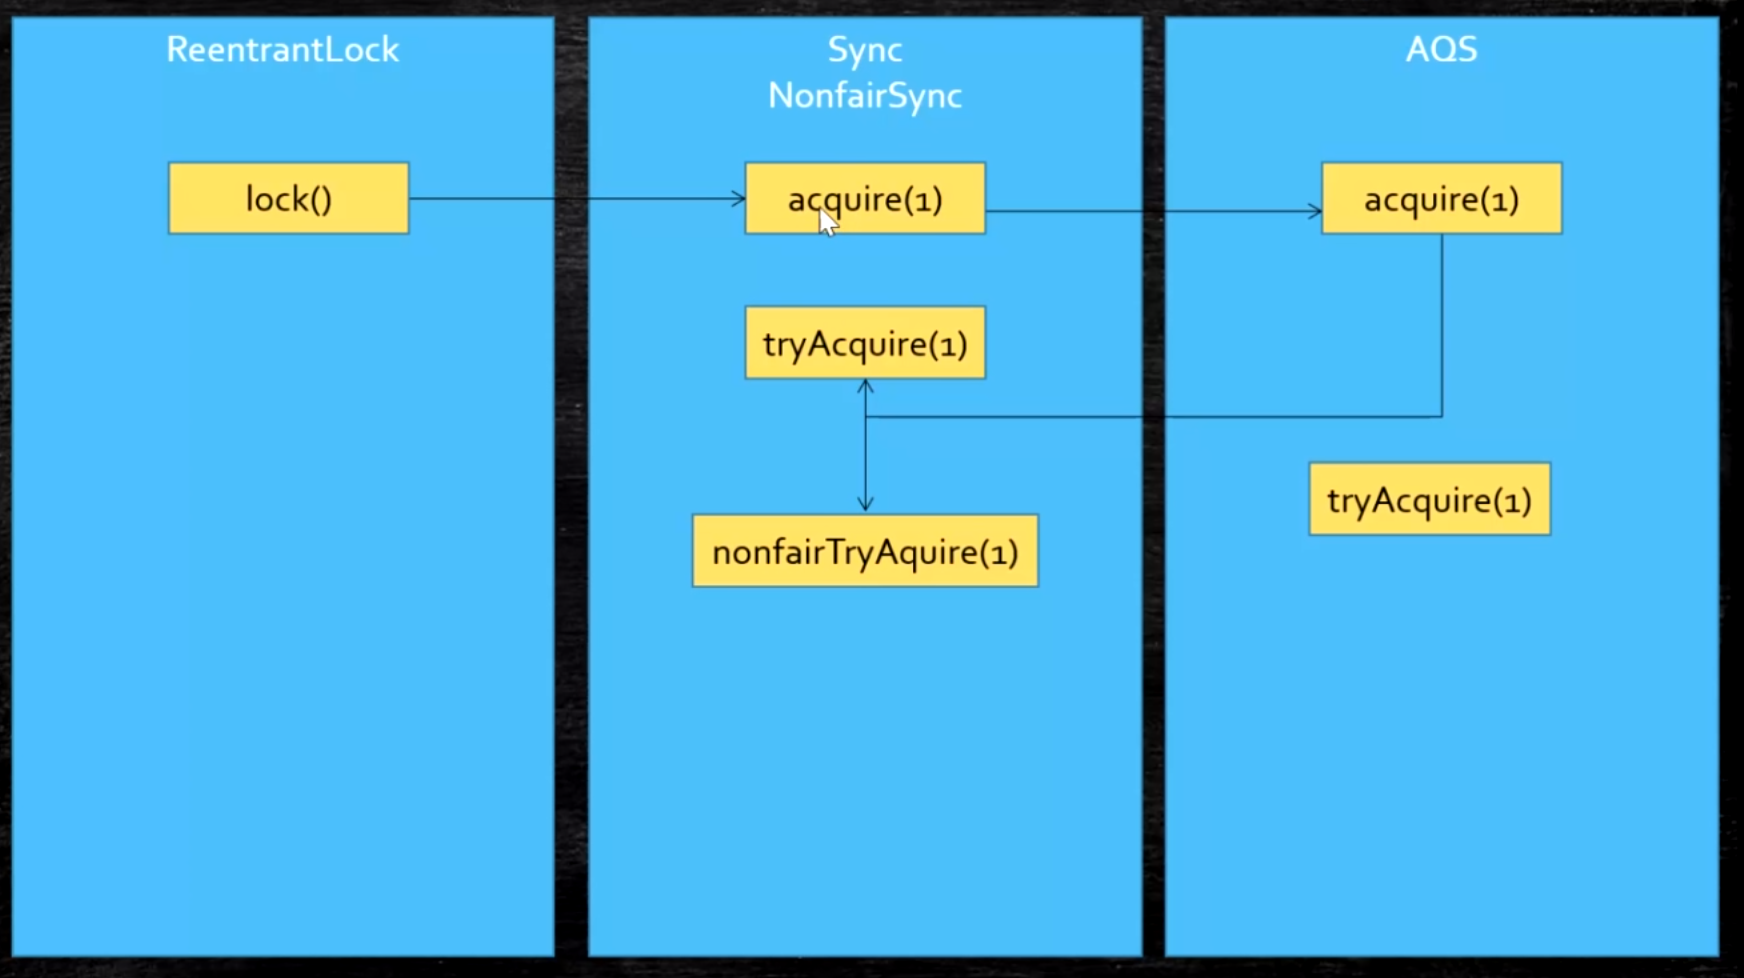
- ReentrantLock#lock
AbstractQueuedSynchronizer#compareAndSetState:CAS 把 state 从 0 变为 1,若成功则代表拿到锁
AbstractOwnableSynchronizer#setExclusiveOwnerThread:若抢到锁,则设置当前线程为独占线程
AbstractQueuedSynchronizer#acquire
1
2
3
4
5
| public final void acquire(int arg) {
if (!tryAcquire(arg) &&
acquireQueued(addWaiter(Node.EXCLUSIVE), arg))
selfInterrupt();
}
|
ReentrantLock.NonfairSync#tryAcquire
1. ReentrantLock.Sync#nonfairTryAcquire:
- state 为 0,则继续调用 compareAndSetState 抢锁(尝试把 state 变为 1,成功则接着调用 setExclusiveOwnerThread)
- state 为 > 0,且当前线程是独占访问的那个线程(说明锁重入),则 state++(此时 state 代表重入线程数)
- 否则 TryAcquire 失败
TryAcquire 失败则调用 AbstractQueuedSynchronizer#addWaiter:使用 CAS 加入链表队列
1
2
3
4
5
6
7
8
9
10
11
12
13
14
15
16
17
18
19
20
21
22
23
24
25
26
27
28
29
30
31
32
|
private Node addWaiter(Node mode) {
Node node = new Node(Thread.currentThread(), mode);
Node pred = tail;
if (pred != null) {
node.prev = pred;
if (compareAndSetTail(pred, node)) {
pred.next = node;
return node;
}
}
enq(node);
return node;
}
private Node enq(final Node node) {
for (;;) {
Node t = tail;
if (t == null) {
if (compareAndSetHead(new Node()))
tail = head;
} else {
node.prev = t;
if (compareAndSetTail(t, node)) {
t.next = node;
return t;
}
}
}
}
|
jdk 9 使用 VarHandler.set(this, pred) 代替 node.prev = pred;,其调用 native 实现(相当于直接操纵二进制码),效率比反射高
VarHandler 指向一个变量
1. AbstractQueuedSynchronizer#acquireQueued:加入队列后不断监听前一个节点,若前节点为头结点(已拿到锁),则试图去抢锁,成功则返回 false(不中断)
1
2
3
4
5
6
7
8
9
10
11
12
13
14
15
16
17
18
19
20
21
| final boolean acquireQueued(final Node node, int arg) {
boolean failed = true;
try {
boolean interrupted = false;
for (;;) {
final Node p = node.predecessor();
if (p == head && tryAcquire(arg)) {
setHead(node);
p.next = null;
failed = false;
return interrupted;
}
if (shouldParkAfterFailedAcquire(p, node) &&
parkAndCheckInterrupt())
interrupted = true;
}
} finally {
if (failed)
cancelAcquire(node);
}
}
|